

Replacing the window motor assembly in a tinted window can seem like a daunting task, but with the right guidance and tools, it can be accomplished efficiently. As a supplier of high - quality Window Motor Assembly, I've seen firsthand the importance of proper replacement procedures. In this blog, I'll walk you through the step - by - step process of replacing the window motor assembly in a tinted window.
Understanding the Window Motor Assembly
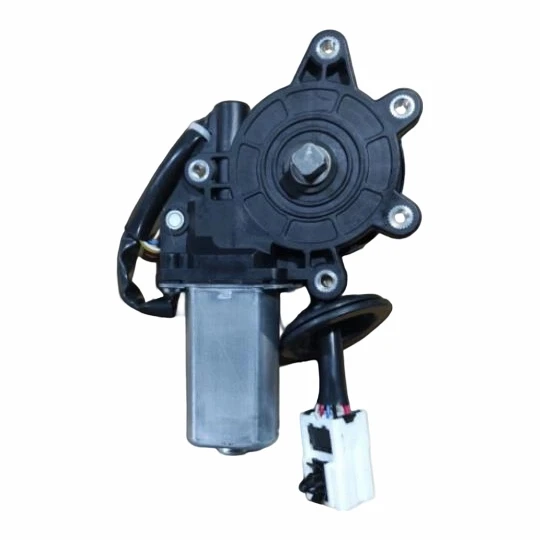
Before we dive into the replacement process, it's essential to understand what a window motor assembly is. A window motor assembly is a crucial component of a vehicle's power window system. It consists of a motor, a regulator, and sometimes a control module. The motor provides the power to move the window up and down, while the regulator ensures smooth and controlled movement. There are different types of window motor assemblies, such as Automatic Car Window Motor and Window Motor Actuator, each designed to meet specific vehicle requirements.
Tools and Materials You'll Need
- Socket and wrench set: You'll need various sizes to remove bolts and nuts holding the door panel and motor assembly in place.
- Trim removal tools: These are used to gently pry off the door panel without damaging it.
- New window motor assembly: Make sure it's compatible with your vehicle's make, model, and year.
- Electrical tape: To secure electrical connections.
- Safety glasses and gloves: To protect your eyes and hands during the process.
Step 1: Prepare Your Vehicle
First, park your vehicle in a safe and well - lit area. Turn off the engine and remove the key from the ignition. This will prevent any accidental electrical shocks or movement of the window while you're working on it. Put on your safety glasses and gloves to protect yourself from sharp edges and debris.
Step 2: Remove the Door Panel
Use the trim removal tools to carefully pry off the small plastic covers on the door panel. These covers usually hide screws. Once the covers are off, use the appropriate socket or wrench to remove the screws. Start from the bottom of the door panel and work your way up. After removing all the screws, gently pry the door panel away from the door frame. Be careful not to break any of the plastic clips that hold the panel in place. Once the panel is loose, disconnect any electrical connectors attached to it, such as the power window switch and door lock switch.
Step 3: Locate the Window Motor Assembly
After removing the door panel, you'll see a plastic or metal vapor barrier. Carefully peel it back to expose the window motor assembly. The motor assembly is usually located near the bottom of the door, attached to the window regulator.
Step 4: Disconnect the Electrical Connectors
Before removing the motor assembly, you need to disconnect the electrical connectors. These connectors supply power to the motor. Gently press the release tab on the connector and pull it away from the motor. Wrap the exposed connectors with electrical tape to prevent any short - circuits.
Step 5: Remove the Old Window Motor Assembly
Use the socket and wrench set to remove the bolts or nuts holding the motor assembly to the window regulator. There are usually two or three bolts. Once the bolts are removed, carefully lift the old motor assembly out of the door. Be careful not to let the window fall while removing the motor.
Step 6: Install the New Window Motor Assembly
Take the new window motor assembly and align it with the window regulator. Insert the bolts or nuts and tighten them securely using the socket and wrench set. Make sure the motor is properly seated and there is no play. Reconnect the electrical connectors to the new motor assembly. Ensure the connection is tight and secure.
Step 7: Test the New Window Motor Assembly
Before reassembling the door panel, test the new motor assembly. Reconnect the power window switch on the door panel and turn the ignition to the "on" position. Press the window switch to check if the window moves up and down smoothly. If the window doesn't move or there are any strange noises, double - check the electrical connections and the installation of the motor assembly.
Step 8: Reassemble the Door
If the new window motor assembly is working correctly, it's time to reassemble the door. Replace the vapor barrier and smooth it out to ensure a proper seal. Reconnect any electrical connectors on the door panel. Carefully place the door panel back onto the door frame and press it firmly until the plastic clips snap into place. Replace the screws and plastic covers you removed earlier.
Step 9: Final Checks
Once the door panel is back on, test the window again to make sure it still works properly. Check for any rattling or loose parts. If everything looks and works fine, you've successfully replaced the window motor assembly in your tinted window.

Tips and Tricks
- Keep track of all the screws and bolts you remove. Use a small container to hold them so you don't lose any.
- If you're having trouble removing a stubborn bolt, apply some penetrating oil and let it sit for a few minutes before trying again.
- When reconnecting electrical connectors, make sure they are clean and free of dirt or corrosion. You can use a small amount of electrical contact cleaner if necessary.
Common Mistakes to Avoid
- Forgetting to disconnect the battery: This can lead to electrical shocks or damage to the vehicle's electrical system.
- Using the wrong tools: Using improper tools can damage the door panel, motor assembly, or electrical connectors.
- Not testing the new motor assembly before reassembling the door: This can result in having to disassemble the door again if there are any issues.
Why Choose Our Window Motor Assemblies
As a supplier of Window Motor Assembly, we take pride in offering high - quality products. Our window motor assemblies are made from durable materials and undergo strict quality control tests. They are designed to fit a wide range of vehicle makes and models, ensuring a perfect match for your tinted window. Whether you need an Automatic Car Window Motor or a Window Motor Actuator, we have the right product for you.
Contact Us for Your Window Motor Assembly Needs
If you're in the market for a new window motor assembly or have any questions about the replacement process, we're here to help. Our team of experts can provide you with technical support and guidance. We offer competitive prices and fast shipping. Don't hesitate to reach out to us for a quote or to discuss your specific requirements.
References
- "Automotive Electrical Systems" by William H. Crouse and Donald L. Anglin.
- Vehicle repair manuals specific to your vehicle's make and model.